Appearance
Deployment Service
tip
If you need to build a system quickly, you can contact us for a quick cloud image build service (a certain fee will be charged for this method);
Of course, we provide you with free service building tutorial documents for developers to deploy and run.
1 Server configuration
Recommended minimum server configuration:
| Type | Configuration |
|---|---|
| Operating System | CentOS8 |
| CPU | 4 core |
| Memory | 8G |
| Bandwidth | 5M |
| Hard disk | 50G |
tip
If it needs to be deployed on a Windows system, the configuration required to consume system memory and CPU will be higher;
A Linux operating system configuration is recommended.
2 Project dependent plug-in description
Program depends on plug-ins
| Name | Version | Description |
|---|---|---|
| Mysql | 8.0 | Minimum version 5.7, recommended to use 8.0 |
| Redis | 6.2 | Cache Service |
| Nginx | 1.2.0 | Proxy Service |
| RabbitMq | 3.9.4 | MQ message queue |
| JDK | 1.8 | Java program dependencies |
note
In the construction case, Mysql is version 8.0, and the execution of the SQL file is also version 8.0
Executing version 5.7 will cause syntax incompatibility and other problems! ! ! Please try to build the service according to the configuration standard
Or contact us to build using a cloud image.
3 Plug-in installation & environment configuration
3.1 Install Pagoda
tip
Tutorial to use Pagoda to quickly install plugins Quickly install Mysql, Redis, Nginx, Docker, etc.
If your server has multiple disks and you need to put the Pagoda program and subsequent logs on the hard disk, such as:
/mntor/home(if there is no other disk or you don’t need to switch the installation directory, skip to 3 steps)
Such as a large space disk directory /mnt example
Switch to the large disk directory
bash
cd /mnt1 Create the www directory needed for pagoda panel installation
bash
mkdir www- Create a /mnt/www soft link to /www (create a www "shortcut" for the system root directory to point to /mnt/www)
bash
cd /

ln -s /mnt/www /www- Connect to your Linux server using the SSH connection tool and mount the disk to start the installation:
Pagoda linux official installation tutorial
Centos installation script (this method is used in this tutorial)
bash
yum install -y wget && wget -O install.sh https://download.bt.cn/install/install_6.0.sh && sh install.sh ed8484becUbuntu/Deepin installation script
bash
wget -O install.sh https://download.bt.cn/install/install-ubuntu_6.0.sh && sudo bash install.sh ed8484becDebian installation script
bash
wget -O install.sh https://download.bt.cn/install/install-ubuntu_6.0.sh && bash install.sh ed8484bectip
After the installation is successful, your server access address and account password will be printed out; you can also enter the bt command in the console to get Access and log in according to your server pagoda address. After logging in, you need to bind your account
3.2 Install plugin Mysql
Find the directory on the left [Software Store] > search for Mysql by application, find the operation on the right click Install, and then open the homepage display switch
3.3 Install plugin Redis
Find the directory on the left [Software Store] > App search Redis Find the operation on the right Click Install, then open the homepage display switch
3.4 Install plugin Nginx
Find the directory on the left [Software Store] > App search Nginx Find the operation on the right Click Install, then open the homepage display switch
3.5 Install plugin Docker
Find the directory on the left side [Software Store] > App search Docker, find the operation on the right side, click Install and open the home page display switch
3.6 Open port number
tip
If you are a cloud server, you need to open the port number that needs to be opened on the cloud platform first
[Security] > Firewall release port
text
3306 MySQL service default port
6379 Redis
5672 RabbitMq
15672 RabbitMq
80 web page access (they are all open by default, and may be more different, and cloud vendors will not open if they are not registered, etc.)
3.7 Configure Mysql
Pagoda Website Directory on the left Home > Lower left corner Software Click on MySQL to find configuration modification
Find
sql-modeand modify it to the following part
text
sql-mode=NO_ENGINE_SUBSTITUTION, STRICT_TRANS_TABLESClick Save, find "Services" and click Restart mysql
3.8 Configure Nginx
Before configuration, you need to prepare the record domain name such as demo.iotos.top and specify to resolve to your server
Pagoda panel Left directory Home > Left bottom corner Software Click Nginx to find configuration modification
Copy the following file, paste it, click Save, find the service and click Restart Nginx
text
user www www;
worker_processes auto;
error_log /www/wwwlogs/nginx_error.log crit;
pid /www/server/nginx/logs/nginx.pid;
worker_rlimit_nofile 51200;

stream {
     log_format tcp_format '$time_local|$remote_addr|$protocol|$status|$bytes_sent|$bytes_received|$session_time|$upstream_addr|$upstream_bytes_sent|$upstream_bytes_received|$upstream_connect_time';

     access_log /www/wwwlogs/tcp-access.log tcp_format;
     error_log /www/wwwlogs/tcp-error.log;
     include /www/server/panel/vhost/nginx/tcp/*.conf;
}

events
     {
         use epoll;
         worker_connections 51200;
         multi_accept on;
     }

http
     {
         include mime.types;
#include luawaf.conf;

include proxy.conf;

         default_type application/octet-stream;

         server_names_hash_bucket_size 512;
         client_header_buffer_size 32k;
         large_client_header_buffers 4 32k;
         client_max_body_size 50m;

         sendfile on;
         tcp_nopush on;

         keepalive_timeout 60;

         tcp_nodelay on;

         fastcgi_connect_timeout 300;
         fastcgi_send_timeout 300;
         fastcgi_read_timeout 300;
         fastcgi_buffer_size 64k;
         fastcgi_buffers 4 64k;
         fastcgi_busy_buffers_size 128k;
         fastcgi_temp_file_write_size 256k;
fastcgi_intercept_errors on;

         gzip on;
         gzip_min_length 1k;
         gzip_buffers 4 16k;
         gzip_http_version 1.1;
         gzip_comp_level 2;
         gzip_types text/plain application/javascript application/x-javascript text/javascript text/css application/xml;
         gzip_vary on;
         gzip_proxied expired no-cache no-store private auth;
         gzip_disable "MSIE [1-6]\.";

         limit_conn_zone $binary_remote_addr zone=perip:10m;
limit_conn_zone $server_name zone=perserver:10m;

         server_tokens off;
         access_log off;

server
     {
         listen 888;
         server_name phpmyadmin;
         index index.html index.htm index.php;
         root /www/server/phpmyadmin;

         #error_page 404 /404.html;
         include enable-php.conf;

         location ~ .*\.(gif|jpg|jpeg|png|bmp|swf)$
         {
             expires 30d;
         }

         location ~ .*\.(js|css)?$
         {
             expires 12h;
         }

         location ~ /\.
         {
             deny all;
         }

         access_log /www/wwwlogs/access.log;
}


       server {
        listen 80; #Listening port
        server_name demo.iotos.top;

        location / {
            root iotos;
            index index.html;
            try_files $uri $uri/ /index.html;
    }

location /prod-api/ {
proxy_set_header Host $http_host;
proxy_set_header X-Real-IP $remote_addr;
proxy_set_header REMOTE-HOST $remote_addr;
proxy_set_header X-Forwarded-For $proxy_add_x_forwarded_for;
proxy_pass http://localhost:8080/;
}


   }


include /www/server/panel/vhost/nginx/*.conf;
}
3.9 Install RabbitMQ
SSH connection tool to connect to your Linux go to terminal panel type
bash
docker pull rabbitmq:3.9.4-managementview mirror
bash
docker imagescreate rabbitmq container
bash
docker run -d --restart=always --name iotos-rabbit -e RABBITMQ_DEFAULT_USER=iotos_topMQ -e RABBITMQ_DEFAULT_PASS=iotos_topMQ -p 15672:15672 -p 4369:4369 -p 5671-5672:5671-5672 -p 1 5671:15671 - p 25672:25672 rabbitmq:3.9.4-management3.10 Installation Install JDK1.8
You need to download the JDK compressed package such as dk-8u271-linux-x64.tar.gz dk-8u271-linux-x64.tar.gz
create
/var/java
bash
cd /

mkdir /var/java
Switch to the
/var/javadirectory and upload the downloadedjdkto the folder
bash
cd /var/javaunzip
bash
tar -zxvf jdk-8u271-linux-x64.tar.gzConfigure environment variables Enter the
/etcdirectory and find the fileprofile
bash
cd /etcFind the file
profilein the directory, download it locally, edit it, and add the following code block at the end
bash
export JAVA_HOME=/var/java/jdk1.8.0_271
export CLASSPATH=.:$:CLASSPATH:$JAVA_HOME/lib/
export PATH=$PATH:$JAVA_HOME/bin
Save and upload to the original directory
/etcto refresh the configuration file
bash
source /etc/profileView java version number
bash
java-versiontip
When the version number is output, the JDK has been configured. The example below does not need to be input in the console! ! !
text
java version "1.8.0_271"
Java(TM) SE Runtime Environment (build 1.8.0_271-b09)
Java HotSpot(TM) 64-Bit Server VM (build 25.271-b09, mixed mode)
4 Configure RabbitMQ
4.1 Login to RabbitMQ
tip
- serverIp = your server's ip address Use a browser to open the web management terminal: http://serverIp:15672
Enter the set account iotos_topMQ password iotos_topMQ login
4.2 Add virtual host
Switch to the Admin menu and click Virtual Hosts on the right to fill in the name of the virtual host and confirm the addition
text
Name: /IoTOSCard

Click Add virtual Hosts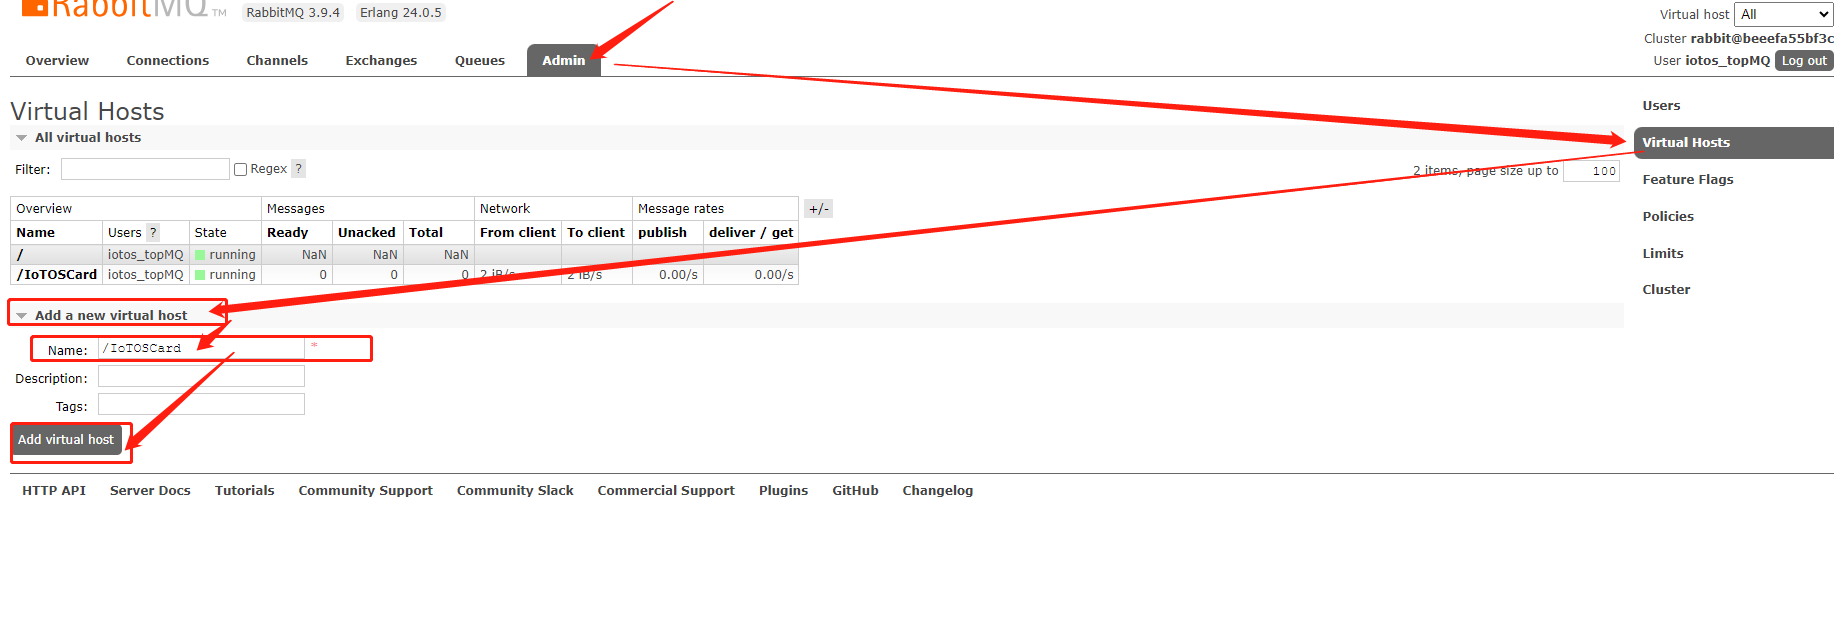
5 import database
5.1 Create a new database
Log in Pagoda panel View database password
View database password
Login Pagoda Panel
After logging in, click the directory Database > click the button Add Database and fill in the following information
Database name iotos_top utf8mb4
Database name iotos_top
password iotos_top
Select the access permission as everyone (for example, in the online environment, it is more necessary to specify an accessible IP address)
The database name, account number, and password can be modified according to your own needs. It is not recommended to directly modify the configuration information during the first deployment test.
5.2 Import database file
Under the project directory
sql, find the .sql file underFirst Deployment ExecutionRun and import
6 Deploy the jar package
6.1 Create directory to place jar
bash
cd /mnt
mkdir runIoTOSJar
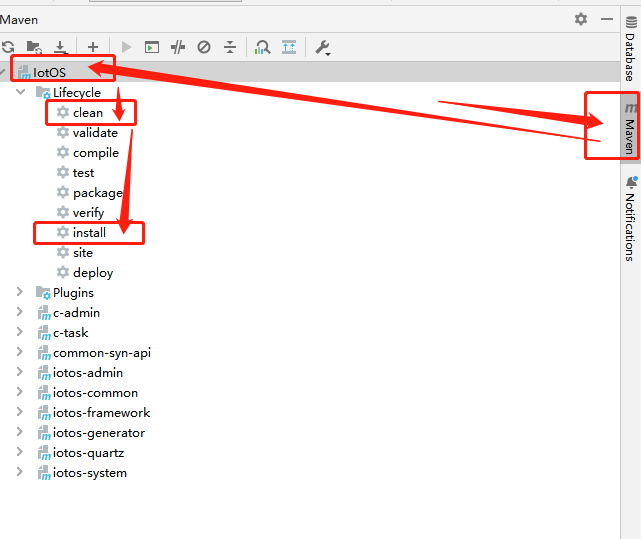
cd /mnt/runIoTOSJar6.2 Maven packaging
find
IotOS
Click clean to clear the packaged data and wait for the execution to complete
Click install again to package the project and wait for the execution to complete
6.3 Upload jar package
Upload the packaged jar to
/mnt/runIoTOSJar
6.4 Start command
Description
-Xms = Initialize memory at startup -Xms128m = Initialize memory at startup with 128MB
-Xmx = maximum memory usage after startup -Xmx512m = maximum memory usage after startup 512MB
PS: It can be adjusted according to the actual situation
Not starting for the first time
You need to check the currently running process and execute it after closing the process
bash
# View the current java program execution process
ps -ef | grep java

# Force kill the process
kill -9 process number process number
Notes on first startup:
When starting, execute and start iotos-admin.jar and then jump to Deployment front end After execution, execute other jar packages to run instructions
【System Monitoring】》 (Timed task) Search task name RabbitMQ initialization Click Execute once to initialize the RabbitMQ queue
Failure to perform RabbitMQ initialization will cause other programs that need to listen to the queue to start errors.
bash
#Switch to the root directory before starting
cd /

#View the current directory
pwd

# Start iotos-admin.jar (main program)
nohup /var/java/jdk1.8.0_271/bin/java -Xms128m -Xmx512m -jar /mnt/runIoTOSJar/iotos-admin.jar >/dev/null 2>&1&

# Start c-admin.jar (main program queue execution consumer)
nohup /var/java/jdk1.8.0_271/bin/java -Xms128m -Xmx512m -jar /mnt/runIoTOSJar/c-admin.jar >/dev/null 2>&1&

# Start c-task.jar (timed task queue execution consumer)
nohup /var/java/jdk1.8.0_271/bin/java -Xms128m -Xmx512m -jar /mnt/runIoTOSJar/c-task.jar >/dev/null 2>&1&
::: Did the tip start normally? If the executed jars are all in the process, the startup is successful :::
bash
# View the java program execution process
ps -ef | grep java
You can also view the detailed information of the log to see if the startup is successful
The default path of the log is
/mnt/iotos/logs, the path will change with the startup path, so be sure to start according to the process, switch to the root directorycd /
mnt/iotos/logs
├── iotos-admin
│ └── iotos-admin.log // Execute the file on the current day and name it iotos-admin-2023-01-01.log after the current day
├── c-admin
│ └── c-admin.log // Execute the file on the current day and name it c-admin-2023-01-07.log after the current day
├── c-task
│ └── c-task.log // Execute the file on the current day and name it c-task-2023-01-07.log after the current day
6.5 Log view
bash
# Switch to the root directory before viewing
cd /

# View the current directory
pwd

# View logs iotos-admin.jar (main program)
tail -f /mnt/iotos/logs/iotos-admin/iotos-admin.log

# View logs c-admin.jar (main program queue execution consumer)
tail -f /mnt/iotos/logs/c-admin/c-admin.log

# View log c-task.jar (main program queue execution consumer)
tail -f /mnt/iotos/logs/c-task/c-task.log
Exit view
Ctrl+c
7 Deploy front end
7.1 Packaging iotos-ui
npm configuration domestic site download source manager installation
bash
# Install nrm source manager
npm i nrm -g

# Check
Available npm source site
nrm ls

# Test download source network speed (this process will be executed for a while)
nrm test

# Choose a test with the fastest milliseconds such as taobao
nrm use taobao
Open the directory
iotos-ui
text
# npm import package
npm i

# build production environment
npm run build:prod
After the command is executed, check the dist directory under iotos-ui. This directory is the front-end interface after packaging
Open the remote tool to find the Nginx path, if you go to the next step according to the process, you can directly switch to the directory
Or find the pagoda and press the directory /www/server/nginx
bash
cd /mnt/www/server/nginx

# create folder
mkdir iotos

# Change to directory iotos
cd /mnt/www/server/nginx/iotos
Files under the dist directory are uploaded to /mnt/www/server/nginx/iotos
8 START ACCESS
Browser Enter your ip address or configured domain name such as demo.iotos.top
Login name admin Password iotos.top